Tuesday, September 21, 2010

Autumn Fun

This Tutorial was written in psp 9 but is compatible in any version.
Animation Shop is required for the animation.
Supplies used in this Tutorial
Tube is the art of Suzanne Woolcott which you must obtain a license to use.
You can find her art here.

All other supplies are from the kit Fun at the Pumpkin Patch which was designed by me.
This is available here.
Let's get started
Open up a white canvas 700x700
Open up your tree and place this on the right hand side of your canvas.
Duplicate and place the other on the opposite site.
Next open up your house and place this inbetween the trees.

Now open up your leaves and duplicate them to make a total of 4 place two of them as your bottom layers and place them at the trees.

Open up your fence and place this in front of your house and trees.
Place your other two leaves in the front of the fence.
Open up your pumpkin and place this where desired and duplicate the pumpkin if desired.

Next open up your suflowers and place them where desired.
Open up your tractor and cart and place these where you like as well.

Next open up your bear that is jumping. Place him sitting in the leaves where his legs are hiding.
Duplicate this layer around 4 times and place one on top of each other moving each one higher then the last.
On the last bear rotate him to the right just a bit and then duplicate him the same amount of times moving each one down towards the leaves.
After you have done this x out all your bear layers except the one sitting in the leaves.

Then add your bear that looks as if he has fallen into the leaves, Place him just below the leaf layer that your bears are jumping from. X him out for now as well.
You might want to label your bears bear 1 2 and so on as it is easier to keep track this way.

Now after you have done this add your tube where desired.
Add a mask to the back of your tag if you desire.
Dont forget to add your copyright to your tag.

Merge visible layers and copy and paste into animation shop.
Go back to psp and x out the first bear and unhide the second.
Copy and paste this after current animation.
Continue to do this until you have your tag completely done with the bears.
Save your tag as a gif and you are done.
I hope you enjoyed this Tutorial
Kristi

Monday, August 9, 2010

Love and Hope


This tutorial was written in psp 9 but is compatible in any version.

Supplies used in this Tutorial

Tube is the art of Zindy Nielsen which you must obtain a license to use.

Get this here.

Template #6 by Babes Designz here
All other supplies are from the kit Color of Love created by me.
This is available for purchase here.


Let's get started

Open up your template and remove your copyright layer.

Open up your scallop frame and place this where the scallop is on the template.

Remove the scallop layer. Add a shadow to the frame.


Open up your Rose frame and place this over the edge of the scallop frame.

Add a shadow.

Next click on the frame background layer and go to selections select all float-defloat

add a new raster layer and flood fill this with a color or paper of choice.
Remove the Background frame layer.


Next open up your window and place this in the middle of your circle and place as your top layer.

Add a shadow of choice.

Click inside of the window opening with your magic wand tool.
Go to selections select all float modify expand by 4 and add a new raster layer. Place this layer just below the window layer.
Add your tube or image inside and select none.


Click on each of your rectangle layers and go to selections select all float-defloat add a new raster layer and flood fill each with a color or papers of choice.
Add a shadow.


Once you have done this decorate your tag with your elements of choice.

Add your Alpha or text of choice and add your copyright.
Add a mask if desired.

Save your tag as a png and you are done.

I hope that you enjoyed this Tutorial

Kristi


Tuesday, July 13, 2010

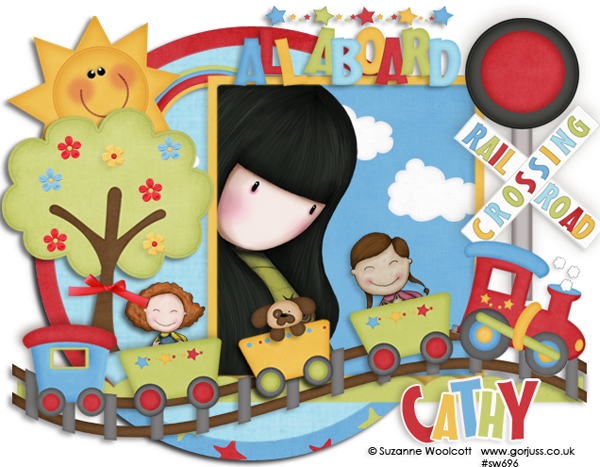
All Aboard

Photobucket
This Tutorial was written in psp 9 but is compatible in any version.
Supplies used in this Tutorial.
Tubes are the art of Suzanne Woolcott which you must obtain a license to use.
You can get this
here.
Template is #12 by Sara of Sara's Sinful creations here
Font used is Massey
All other supplies used are from the kit, A is for All Aboard designed by me.
You can purchase this here.
During this Tutorial add drop shadows of choice to your elements.
Let's get started
Remove your Copyright layer from the template.
Remove the 3 rectangle layers and the bottom frame layers.
Click on the large circle layer in your layer palette. Go to selections select all float-defloat.
Add a new raster layer and flood fill this with a paper or color of your choice.
Remove your circle layer.

Next click inside of the background circle layer and go to selections select all float-defloat and add a new raster layer and flood fill this with a paper or color of choice.
Open up your rainbow and place this in the large circle, slightly hiding it behind the frame.
Next click on the frame layer and go to selections select all float-defloat and add a new raster layer and flood fill this with a color or paper of choice.
Remove the frame layer.
Click inside of the frame and remove your frame background. Using your magic wand tool click inside of the frame and go to selections modify expand by 4 and add a new raster layer. Flood fill this with a color or paper of choice.
Keeping your marching ants around the inside of the frame add your tube as a new layer. Open up your clouds and place them in the frame if desired.
After you have done this go to your layer palette and go to rectangle 1 and remove. Click on rectangle 2 and flip this so the wavy side is up. Go to selections select all float-defloat and add a new raster layer. Flood fill this with a green color or paper of choice for your grass.

Open up your Railroad and place this above the grass layer.
Open up your train pieces and rotate them to make them follow the waves of the train. Once your cars are all on your track place any tubes or elements you desire inside of the cars.
Place your tree where desired and any other elements at this time.
Add your text and name to your tag and you are done, I hope you enjoyed this Tutorial.
Kristi

Saturday, June 26, 2010

To Sir With Love by Lynn


This tutorial was written by Lynn on June 26th, 2010
Please do not copy this tutorial into other sites, email lists, etc.

Supplies needed:
PSP 9 (any version will work)
Tube(s) and or graphic of your choice
I used artwork by Keith Garvey. To use this artwork please visit HERE
Template is by Missy of Divine Intentionz #281 which you can get at her blog HERE
Kit or supplies of choice, I used To Sir With Love by me
Font of choice

The scrap kit I used was called Endearing by me, which you can get HERE

Ok let's get started...

This is a really easy tut. Open a canvas 700 x 700. Open template #281 by Missy. Click on the glittered oval layer. Selections, select all, float, defloat. Add a new layer. Fill with color of choice. This color is going to be blurred and in the very background. Once happy fill with the color you chose. Selections none. Apply gaussian blur 25. Now arrange it how you want it to peek out from the oval. When happy lower opacity of this layer to about 35% or your own preference.

Open heart sparkles. Copy and paste as a new layer directly above the blurred background you made. Arrange as happy.

Click on glittered oval layer. You can either fill with a color of choice or use what is there.

Click on oval layer. Select all float, defloat. New layer. Fill with color of choice. Hide original oval layer.

Click on circle layer. I left this black for the background but the choice is up to you. Open tube of choice. Copy and paste as a new layer. Place inside the circle layer. Remove any excess tube from the bottom of the circle. Apply drop shadow as needed.

Open floral swirl. Copy and paste as a new layer. Arrange it so it is to the side of the tube and circle. (see my tag as example) When happy with placement add a drop shadow of choice.

I closed out the word art layers and the star layers from the templates but it is your choice if you wish to include these on your tag.

Open heart pearl. Copy and paste as a new layer. Resize and rotate slightly as you like. Arrange on the swirl as you like it. (again see my tag as example) Apply drop shadow as happy to each heart layer.

Add your text where you are happy now. Apply any appropriate copyright information. Crop and resize as needed. Save as a png or jpeg and you're done.

Monday, June 21, 2010

Star of the Show

This Tutorial was written in psp 9 and animation shop but is compatible in any version.
Supplies used in this Tutorial
Art is that of Keith Garvey which you must obtain a license to use.
You can purchase this here.

Template is by Missy of Divine Intentionz #338 which you can get at her blog here.
Font used is Century Gothic
Scrapkit used is Uptown Girl which was designed by me. You can purchase this here.

Animation I had found on the net, If this is yours please let me know so I can give proper credit or remove. Right click to save.


Let's get started
Open up your template and remove your copyright layer.

During this Tutorial add a drop shadow of choice to each of your layers.

Open up your paper of choice for your back rectangle.
Go to selections select all float-defloat and add a new raster layer.
Flood fill with the paper or color of choice.

Do the same step above for your circles.

If desired removed the black squares from the frame layer and replace with your makeup mirror frames. Click inside each of the frames with your magic wand tool. Go to selections modify expand by 4 and add a new raster layer and add your tube close up. To remove any excess tube go to selections invert and hit delete on your keyboard. Place the tubes just below the frame layer.

Next in your large middle circle if desired place the diamond star in the middle of the circle.
Place your tube as your top layer.

Next decorate your tag with the elements of your choice.
Add your text and copyright to your tag.
Once you have your tag the way you like copy and paste this over to animation shop.
Duplicate the tag to make a total of 7 frames. Place your animation on the tag where you desire.
Save your tag as a gif and you are done.

I hope you enjoyed this Tutorial
Kristi


Sunday, June 20, 2010

Bad Ass


This Tutorial was written in psp 9 and animation shop but is compatible in any version.
Supplies used in this Tutorial
Tube is the art of Keith Garvey which you must obtain a license to use his art.
You can purchase this here.
Template is by Missy of Divine Intentionz it is #335 get this here.
Fonts used Century Gothic and Bickham Script pro.
All other supplies are from the kit In The Family by KNC Scraps.
You can purchase this here or here.
Road animation I had found off the net, If this is yours please let me know so I can give proper credit or remove Right Click to save.

Let's get started
Open up your template and remove your copyright information and word art if desired.
Remove the background layer as well.
Open up your city and resize this to fit your template.
Place this as your bottom layer. Add a shadow of choice to the city.
Next Click inside of the 2 rectangle layers with your magic wand tool.
Add a new raster layer and flood fill with a background or color of your choice.
Next on your layer palette click on the Dotted line layer and go to selections select all float defloat. Add a new raster layer and flood fill these with a color of choice.
Click on each half circle and do the same step as above.
Click on your two side circles and follow the same step once again.
Next click inside of your circle layer and add a new raster layer.
Flood fill with black.
Place your tubes and elements where you desire.
Add a shadow of choice to each of your elements.
Add your text and copyright to your tag.
Do not add your tube yet.
Merge visible layers and copy and paste your tag into animation shop.
Once in animation shop make a total of 4 frames for your tag.
Then go to edit select all.
Open up your tube in AS and do the 4 frames. Edit select all.
Open up your animation and go to edit select all copy and paste this into the circle in the middle of your tag.
Place your tube where desired on your tag and save your tag as a gif.
You are done, I hope you enjoyed this Tutorial.
Kristi

Friday, June 18, 2010

Strawberry Kisses


This Tutorial was written in psp 9 but is compatible in any version.

Supplies used in this Tutorial
Tube is the art of Elias Chatzoudis, you must obtain a license to use his art.
You can purchase this here.

Template is number 4 by Babes Designz you can get this here.
Font used is Coaster.

Scrapkit called Berry Sweet which was designed by me.
This is available for purchase here.

Let's get started
Open up your template and remove your copyright layer and your tree layer.
Open up your scallop frame and place this as a new layer over the large circle layer on the template. Remove the large circle layer on the template.
Add a shadow of choice to your frame.

Click on your middle circle with your magic wand tool and go to selections select all float defloat
add a new raster layer and flood fill this with a color or paper of your choice.
Next open up your tube and place this in the middle of your tag and add a shadow of choice.

Click on the rectangle frame layer and go to selections select all float defloat and add a new raster layer. Flood fill this with a color or paper of your choice.
Remove the bottom frame layer.

Next click on the squares inside of the frames and go to selections select all float-defloat and add a new raster layer and flood fill these with a paper or color of choice.
Remove the square layer.
Place your tube in the two squares where desired.
To remove any excess tube click on the paper layer that you filled these with and go to selections invert and then click on the tube layer and hit delete.

Next place your butterflies in place of the bats. Remove the Bats layer.
Repeat the butterflies on the opposite side of the tag if desired.

Add a drop shadow to each of your elements.

Next in the Rectangle place your text or elements of choice.
Add your other elements where you like.
Add a shadow to each element.

Add your text and copyright to your tag and you are done.
I hope that you enjoyed this Tutorial
Kristi